

linux网站中虚拟主机的实现
一台Linux中网站虚拟主机的完成主要有三种方式:a、根据ip地址;b、根据端口号;c、根据域名。一下为完成进程:(本试验的Linux虚机系统为rhel5.6)
1、基于域名的实现:
这种方式需要搭建dns域名服务器。
# cat /etc/sysconfig/network-scripts/ifcfg-eth0
DEVICE=eth0
BOOTPROTO=static
IPADDR=192.168.22.133
NETWORK=192.168.22.0
NETMASK=255.255.255.0
BROADCAST=192.168.22.255
HWADDR=00:0C:29:89:05:2E
ONBOOT=yes
# cat /etc/sysconfig/network
NETWORKING=yes
NETWORKING_IPV6=no
HOSTNAME=httpd.com
# cat /etc/resolv.conf
nameserver 192.168.22.133
search httpd.com
#yum install httpd -y
# vim /etc/httpd/conf/httpd.conf
NameVirtualHost 192.168.22.133:80 #将这一行注释符取消掉,*号改成ip地址
<VirtualHost 192.168.22.133:80> #复制粘贴即可得到以下几行(nyy p)
ServerAdmin webmaster@dummy-host.example.com
DocumentRoot /www/bbs
ServerName bbs.httpd.com
ErrorLog logs/dummy-host.example.com-error_log
CustomLog logs/dummy-host.example.com-access_log common
</VirtualHost>
<VirtualHost 192.168.22.133:80>
ServerAdmin webmaster@dummy-host.example.com
DocumentRoot /www/news
ServerName news.httpd.com
ErrorLog logs/dummy-host.example.com-error_log
CustomLog logs/dummy-host.example.com-access_log common
</VirtualHost>
#mkdir -p /www/{news,bbs}
#vim /www/news/index.html
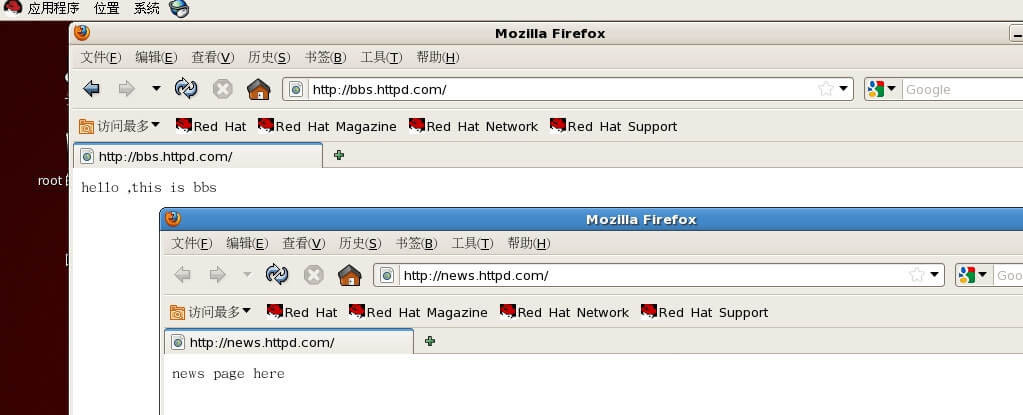
news page here
#vim /www/bbs/index.html
hello ,this is bbs
#service network restart
#service httpd start
#yum install bind bind-chroot bind-utils caching-nameserver -y
#cd /var/named/chroot/etc
#cp -a named.caching-nameserver.conf named.conf
#vim named.conf
options {
listen-on port 53 { any; };
directory "/var/named";
dump-file "/var/named/data/cache_dump.db";
statistics-file "/var/named/data/named_stats.txt";
allow-query { any; };
allow-query-cache { any; };
};
zone "httpd.com" {
type master;
file "httpd.com.zone";
};
zone "22.168.192.in-addr.arpa" {
type master;
file "22.168.192.zone";
};
#cd ../var/named
#touch httpd.com.zone
#touch 22.168.192.zone
#cat localhost.zone > httpd.com.zone
#cat named.local > 22.168.192.zone
#vim httpd.com.zone
$TTL 86400
@ IN SOA @ root (
42 ; serial (d. adams)
3H ; refresh
15M ; retry
1W ; expiry
1D ) ; minimum
IN NS @
IN A 192.168.22.133
bbs IN A 192.168.22.133
news IN A 192.168.22.133
#vim 22.168.192.zone
$TTL 86400
@ IN SOA localhost. root.localhost. (
1997022700 ; Serial
28800 ; Refresh
14400 ; Retry
3600000 ; Expire
86400 ) ; Minimum
IN NS httpd.com.
133 IN PTR bbs.http.com.
133 IN PTR news.http.com.
#service named start
# host bbs.httpd.com
bbs.httpd.com has address 192.168.22.133
# host news.httpd.com
news.httpd.com has address 192.168.22.133
# host 192.168.22.133
133.22.168.192.in-addr.arpa domain name pointer news.http.com.
133.22.168.192.in-addr.arpa domain name pointer bbs.http.com.
在Linux自带的火狐浏览器测试,如下图:

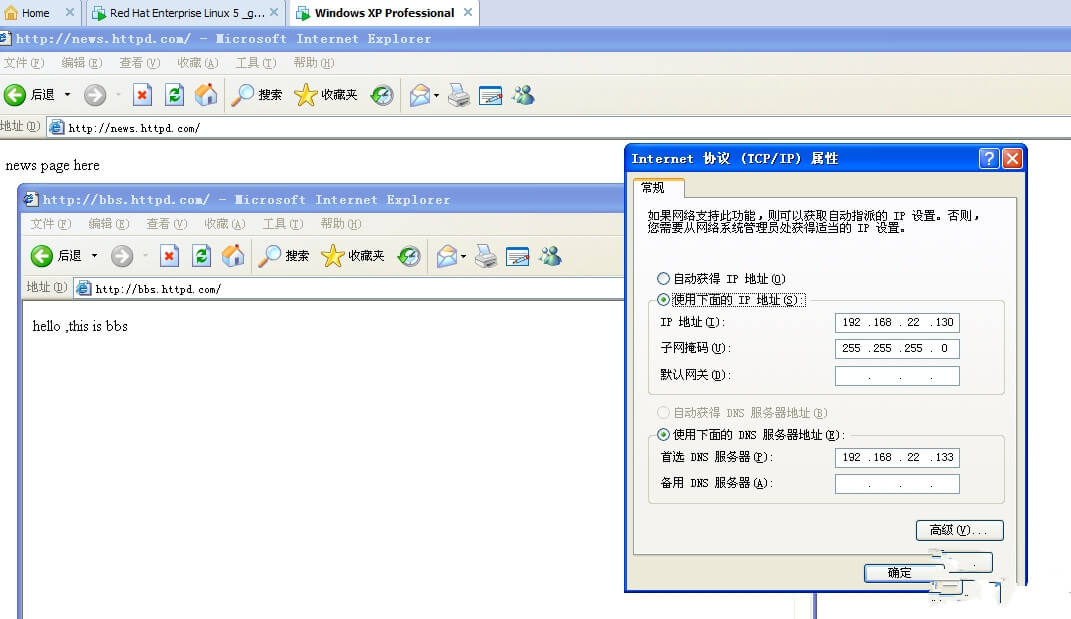
在另外一台虚拟的xp系统上面测试:(此时的Linux和xp虚机均为桥接方式),如下图
ok,到此为止,Linux下http域名虚拟主机的配置完美结束。
2、基于ip地址的实现
#cp ifcfg-eth0 ifcfg-eth0:1
#cp ifcfg-eth0 ifcfg-eth0:2
# cat ifcfg-eth0:1
DEVICE=eth0:1
BOOTPROTO=static
IPADDR=192.168.22.134
NETWORK=192.168.22.0
NETMASK=255.255.255.0
BROADCAST=192.168.22.255
HWADDR=00:0C:29:89:05:2E
ONBOOT=yes
# cat ifcfg-eth0:2
DEVICE=eth0:2
BOOTPROTO=static
IPADDR=192.168.22.135
NETWORK=192.168.22.0
NETMASK=255.255.255.0
BROADCAST=192.168.22.255
HWADDR=00:0C:29:89:05:2E
ONBOOT=yes
#service network restart
#vim /etc/httpd/conf/httpd.conf
<VirtualHost 192.168.22.133:80>
ServerAdmin webmaster@dummy-host.example.com
DocumentRoot /www/133
ServerName 192.168.22.133
ErrorLog logs/dummy-host.example.com-error_log
CustomLog logs/dummy-host.example.com-access_log common
</VirtualHost>
<VirtualHost 192.168.22.134:80>
ServerAdmin webmaster@dummy-host.example.com
DocumentRoot /www/134
ServerName 192.168.22.134
ErrorLog logs/dummy-host.example.com-error_log
CustomLog logs/dummy-host.example.com-access_log common
</VirtualHost>
<VirtualHost 192.168.22.135:80>
ServerAdmin webmaster@dummy-host.example.com
DocumentRoot /www/135
ServerName 192.168.22.135
ErrorLog logs/dummy-host.example.com-error_log
CustomLog logs/dummy-host.example.com-access_log common
</VirtualHost> #要把NameVirtualHost关掉
#mkdir -p /www/{133,134,135}
# cat /www/133/index.html
hello ,this is 133 page.
# cat /www/134/index.html
hi ,this is 134 index
# cat /www/135/index.html
hey,this is 135 index page
#service httpd restart
到此,打开Linux自带的火狐浏览器浏览,如下图所示:
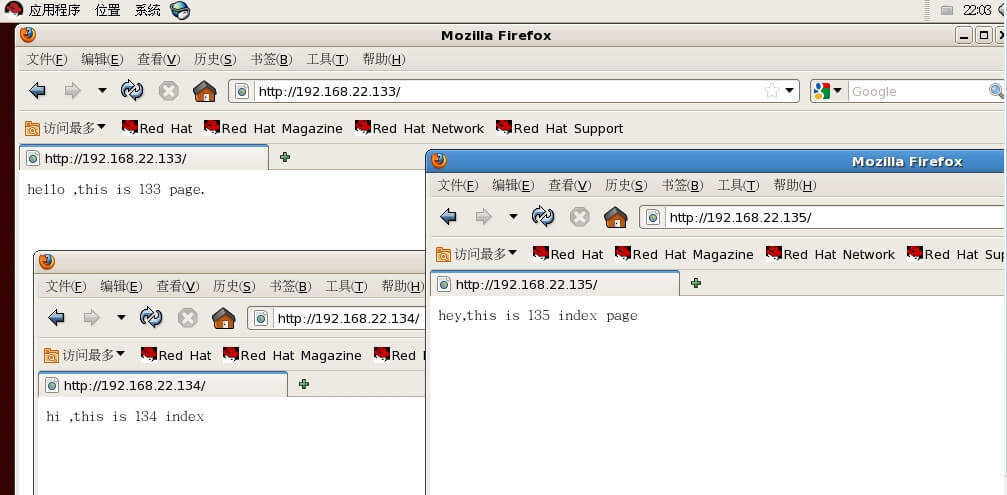
基于ip地址的虚拟主机搭建成功。
3、基于端口的实现:
首先要手工配置一个ip地址,本实验使用的地址为192.168.22.133,改地址怎样配置见方式1详解。
#vim /etc/httpd/conf/httpd.conf
Listen 80
Listen 8080
Listen 8081 #在Listen下面添加下面两行
。。。。
<VirtualHost 192.168.22.133:80>
ServerAdmin webmaster@dummy-host.example.com
DocumentRoot /www/80
ServerName 192.168.22.133
ErrorLog logs/dummy-host.example.com-error_log
CustomLog logs/dummy-host.example.com-access_log common
</VirtualHost>
<VirtualHost 192.168.22.133:8080>
ServerAdmin webmaster@dummy-host.example.com
DocumentRoot /www/8080
ServerName 192.168.22.133
ErrorLog logs/dummy-host.example.com-error_log
CustomLog logs/dummy-host.example.com-access_log common
</VirtualHost>
<VirtualHost 192.168.22.133:8081>
ServerAdmin webmaster@dummy-host.example.com
DocumentRoot /www/8081
ServerName 192.168.22.133
ErrorLog logs/dummy-host.example.com-error_log
CustomLog logs/dummy-host.example.com-access_log common
</VirtualHost>
#mkdir -p /www/{80,8080,8081}
# cat /www/80/index.html
this is port 80 page
# cat /www/8080/index.html
this is port 8080 test page
# cat /www/8081/index.html
hello, this is port 8081 page
#service httpd restart
到此用Linux自带的火狐浏览器测试一下,如下图所示:
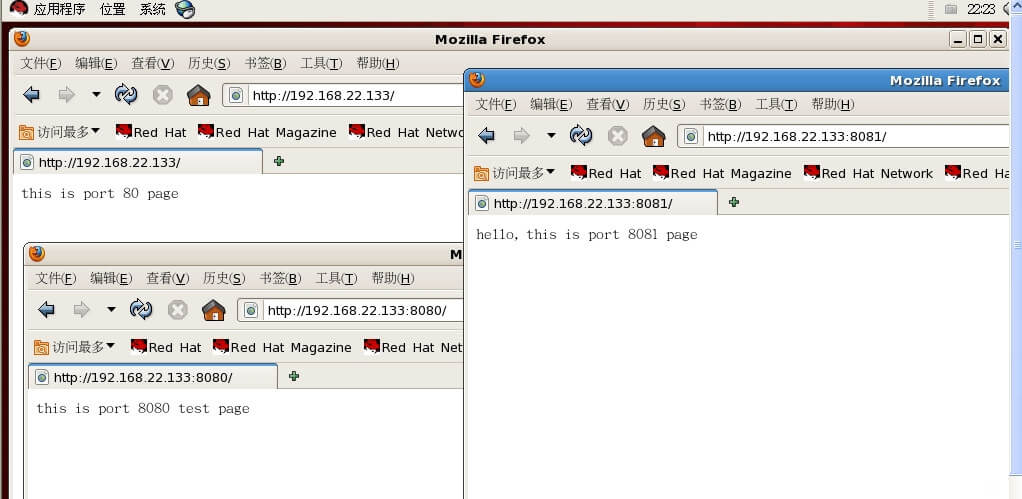
到此,根据端口方法的方式装备成功。
到此为止,Linux网站虚拟主机的三种装备方法装备结束。